YOLOv5: Train Custom Dataset
We will learn
- training YOLOv5 on our custom dataset
- visualizing training logs
- using trained YOLOv5 for inference
- exporting trained YOLOv5 from PyTorch to other formats.
Clone YOLOv5 and install dependencies
git clone https://github.com/ultralytics/yolov5
cd yolov5
pip install -r requirements.txt
Prepare custom datasets
YOLO darknet format
Dataset in YOLO darknet format has the following structure:
There’s a file name
_darknet.labelscontaining object names (one name per line).For each
.imgfile, there is a corresponding.txtfile (same name, but with.txt-extension) in the same directory. I.e.dataset |- train |- _darknet.labels |- train_img_001.jpg |- train_img_001.txt ... |- train_img_xxx.jpg |- train_img_xxx.txt |- valid # similar structure as train |- test # similar structure as trainThe
*.txtfile specifications are:- One row per object
- Each row is
class x_center y_center width heightformat. - Box coordinates must be in normalized xywh format (from 0 - 1). If your boxes are in pixels, divide
x_centerandwidthby image width, andy_centerandheightby image height. - Class numbers are zero-indexed (start from 0).
For example 1:

The label file corresponding to the above image contains 2 persons (class
0) and a tie (class27):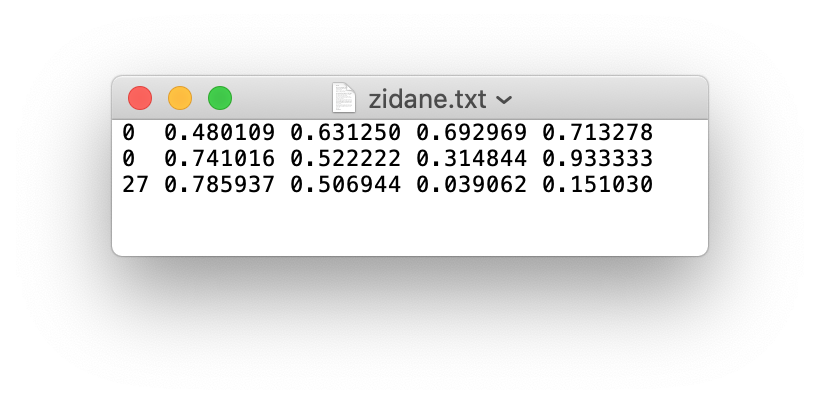
YOLOv5 format
If no objects in image, no
*.txtfile is requiredYOLOv5 locates labels automatically for each image by replacing the last instance of /images/ in the images directory with /labels/. Therefore, folder structure of dataset should look like below:
dataset
|- images
    |- train
        |- train_img_001.jpg
            ...
        |- train_img_xxx.jpg
    |- valid
    |- test
|- labels
    |- train
        |- train_img_001.txt
            ...
        |- train_img_xxx.txt
    |- valid
    |- test
YOLO darknet format –> YOLOv5 format
Assuming we have a dataset in YOLO darknet format, we want to convert it to YOLOv5 format.
from pathlib import Path
from shutil import rmtree, copy2
from tqdm import tqdm

def copy_files(src_dir, dest_dir, ext="jpg"):
    """
    Copy files with the same extension from source directory to destination directory

    Parameters
    ----------
    src_dir : str
        source directory
    dest_dir : str
        destination directory
    ext : str, optional
        extension of files to be moved, by default "jpg"
    """
    for file in tqdm(Path(src_dir).glob(f"*.{ext}"), desc=f"Copying .{ext} files from {src_dir} to {dest_dir}"):
        copy2(file, dest_dir)


def convert_dataset_darknet_to_yolov5(src_dir_darknet, dest_dir_yolov5, dataset_types=["train", "valid", "test"]):
    """
    Convert dataset from YOLO darknet format to scaled YOLOv4 format

    Parameters
    ----------
    src_dir_darknet : str
        source dataset in YOLO darknet format
    dest_dir_scaled_yolov4 : str
        destination dataset in scaled YOLOv4 format
    dataset_types : list, optional
        types of dataset, by default ["train", "valid"]
    """
    dest_dir_yolov5 = Path(dest_dir_yolov5)
    if dest_dir_yolov5.exists():
        rmtree(dest_dir_yolov5)

    dest_dir_yolov5.mkdir()

    for dir in ["images", "labels"]:
        for dataset_type in dataset_types:
            dest_dir = dest_dir_yolov5.joinpath(f"{dir}", f"{dataset_type}")
            dest_dir.mkdir(parents=True)

            src_dir = Path(src_dir_darknet).joinpath(f"{dataset_type}")

            ext = "jpg" if dir == "images" else "txt"
            copy_files(src_dir, dest_dir, ext=ext)

            print(f"Copy {dir} from {src_dir} to {dest_dir} done!")
Define training configuration
For training we need to configure a .yaml file which specifies
download commands/URL for auto-downloading (optional)
the path of training and validation folder
number of classes
classes names
and put this .yaml file in yolov5/data/.
For example, let’s say we have custom-dataset folder in YOLOv5 format next to yolov5. This custom dataset containes 3 object classes: “cat”, “dog”, “monkey”.
Then yolov5/data/custom-dataset.yaml should look like:
train: ../custom-dataset/images/train
valid: ../custom-dataest/images/valid

nc: 3
names: ["cat", "dog", "monkey"]
Select a model
Select a pretrained model to start training from 2:
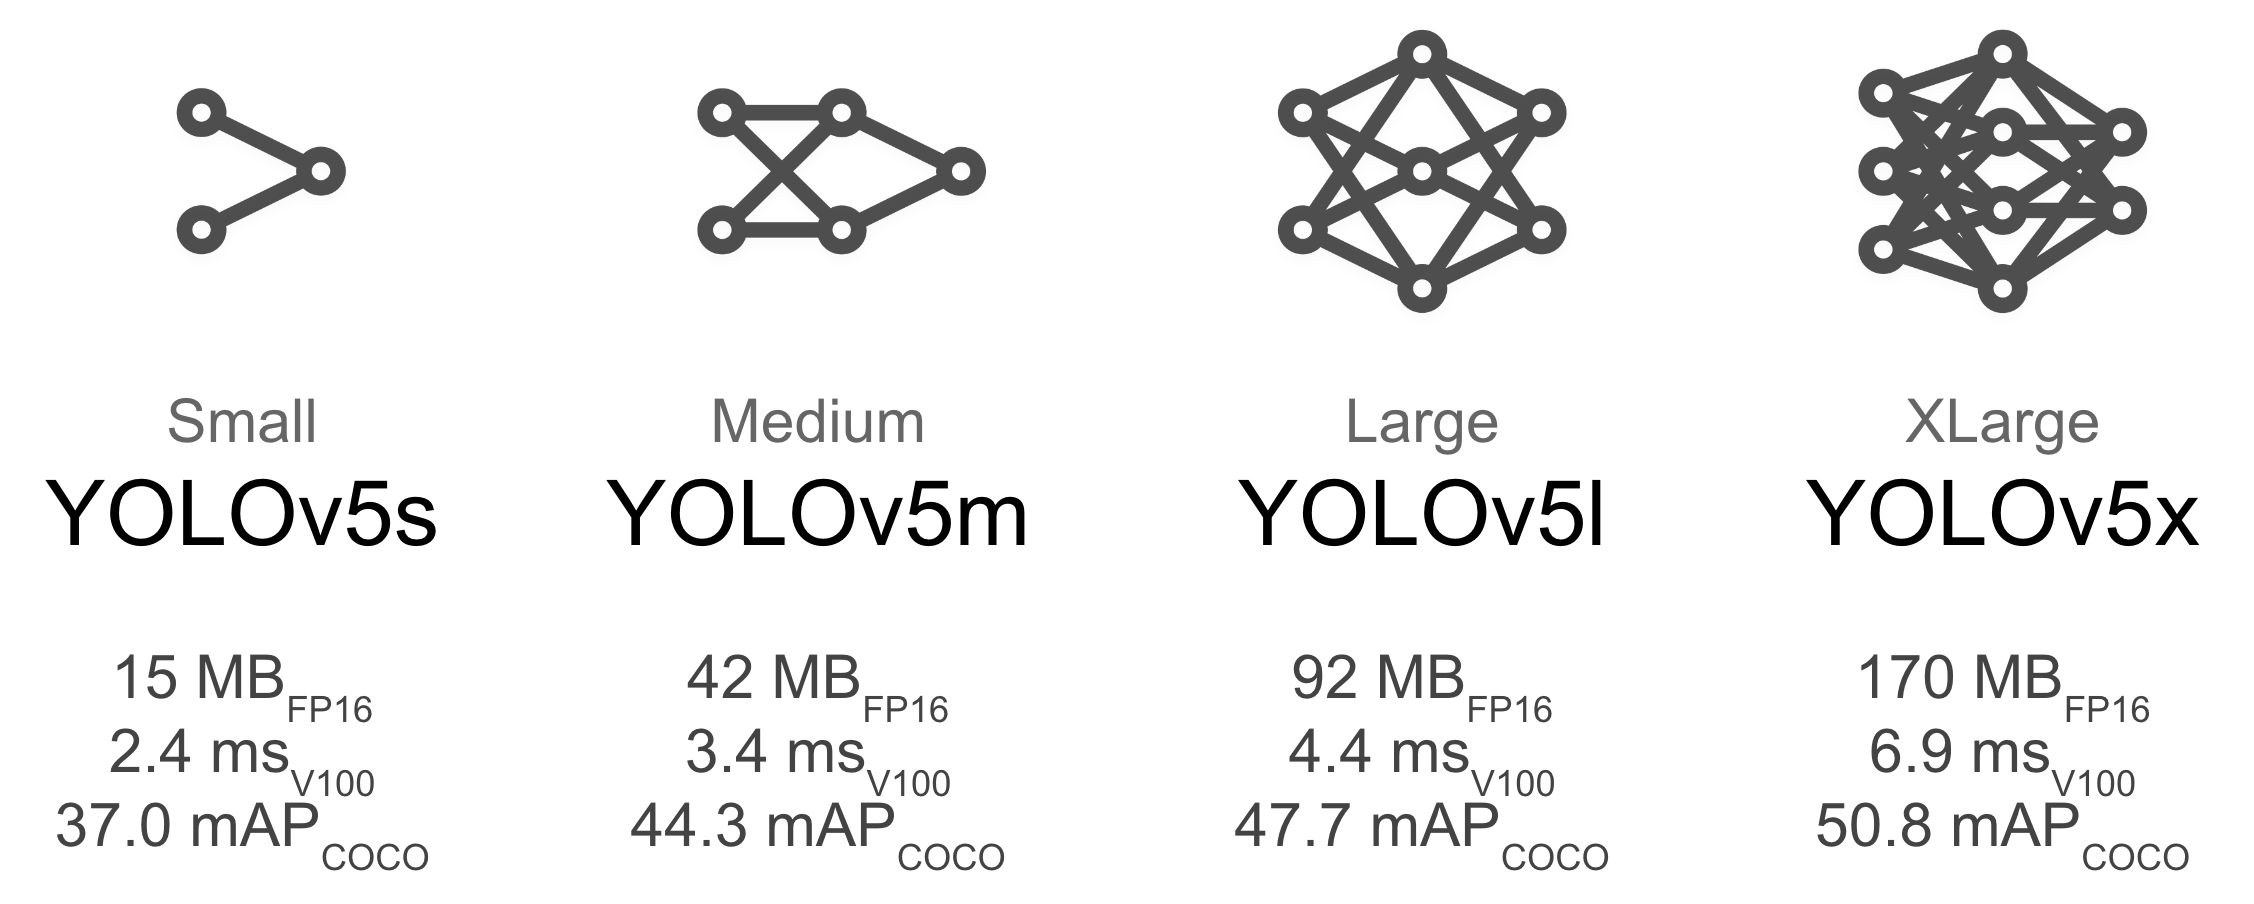
| Model | APval | APtest | AP50 | SpeedGPU | FPSGPU | params | GFLOPS | |
|---|---|---|---|---|---|---|---|---|
| YOLOv5s | 37.0 | 37.0 | 56.2 | 2.4ms | 416 | 7.5M | 17.5 | |
| YOLOv5m | 44.3 | 44.3 | 63.2 | 3.4ms | 294 | 21.8M | 52.3 | |
| YOLOv5l | 47.7 | 47.7 | 66.5 | 4.4ms | 227 | 47.8M | 117.2 | |
| YOLOv5x | 49.2 | 49.2 | 67.7 | 6.9ms | 145 | 89.0M |
For example, we select YOLOv5s, the smallest and fastest model available. (YOLOv5m, YOLOv5l, YOLOv5x work similarly.)
In order to use YOLOv5s for training on custom dataset, we need to adjust models/yolov5s.yaml: change number of class nc according to our custom dataset. Following the example above, the value of nc is 3.
models_dir = "yolov5/models"
yolov5s = os.path.join(models_dir, "yolov5s.yaml")
yolov5s_custom = os.path.join(models_dir, "yolov5s_custom.yaml")

num_class = 3

with open(yolov5s, "r") as reader, open(yolov5s_custom, "w") as writer:
    lines = reader.readlines()

    # change number of classes according to custom dataset
    lines[1] = f"nc: {num_class}  # number of classes\n"

    writer.writelines(lines)
Train
Now we’re ready for training YOLOv5 on our custom dataset.
To kick off training, we execute train.py with the following options:
img: define input image size
batch: determine batch size
epochs: define the number of training epochs. (Note: often, 3000+ are common here!)
data: set the path to our yaml file
cfg: specify our model configuration
weights: specify a custom path to weights.
Use pretrained weights (recommended):
--weights yolov5s.pt(Pretrained weights are auto-downloaded from the latest YOLOv5 release.)
Use randomly initialized weights (NOT recommended!):
--weights ''
name: result names
nosave: only save the final checkpoint
cache: cache images for faster training
python train.py --img 416 --batch 16 --epochs 1000 --data ./data/masks.yaml --cfg ./models/yolov5s_masks.yaml --weights yolov5s.pt --cache-images
Training logging
All training results are saved to
runs/train/with incrementing run directories, i.e.runs/train/exp,runs/train/exp1,runs/train/exp2, etc.We can view training losses and performance metrics using Tensorboard
If training on Google Colab:
%load_ext tensorboard
%tensorboard --logdir runs
Training losses and performance metrics are also saved to a logfile.
- If given no name, it defaults to
results.txt. We can also specify the name with--nameflag when we train. results.pngcontains plotting of different metrics
- If given no name, it defaults to
Run inference with trained weights
Trained weights are saved by default in
runs/train/exp/weightsfolder.- The best weights
best.ptand the last weightslast.ptare saved
- The best weights
For inference we use
detect.pypython detect.py --weights ./runs/train/exp/weights/best.pt --img 416 --conf-thres 0.5 --source <path-to-test-set>
Export a trained YOLOv5 model
- Install dependencies
- Use
models/export.pyto export to ONNX, TorchScript and CoreML formats
Google Colab Notebook
Open in Colab
Reference
YOLOv5 repo: ultralytics/yolov5
- Developed actively
- Tutorials
Tutorials
Official tutorials from YOLOv5 repo
Roboflow tutorials
Blog post: How to Train YOLOv5 On a Custom Dataset
Video tutorial
Very detailed tutorial and explanation: Yolov5 系列2— 如何使用Yolov5训练你自己的数据集
YOLOv5 explanation: 深入浅出Yolo系列之Yolov5核心基础知识完整讲解